This week I discovered something so neat that I just have to share. I've known for quite a while how to export KMZ files from ArcMap for use in Google Earth. This is neat, but from a public participation point of view has the downside that the person who is receiving the map must also have Google Earth installed. It is free, but individuals may be reluctant to install additional software - or unable to install additional software if their company does not give them administrative permissions on their computers. The individual must also understand how to use Google Earth, and to be quite honest it can be a bit slow to load with all the satellite imagery.
While looking at Google Earth this week, I also noticed that it was possible to export content for use in Google Maps. So I fiddled around with things until I figured out how to do it. Here's an example of a finished product (I'll give you step by step instructions in a second). The great thing about presenting maps this way is that you can just distribute a link via email to anyone you want to look at the map - and those individuals can in turn forward the email with a link to anyone (no forwarding of attachments required). Furthermore, the individual only needs to have a web browser installed on his or her machine to view the map - it is a fair bet that just about anyone with email capabilities also has a web browser. Then the recipient can zoom in and out in Google maps just as always - with the information you've sent them hovering over everything.
Creating those maps for distribution is a bit more complicated than using them, and I'd like to describe the steps here in case you'd like to do it yourself. This does require you to have ESRI's ArcMap installed, but if you have another GIS program that can export KMZ files, you can pick up the steps at that point.
Within ESRI's ArcMap version 10:
1. Add the shapefile(s) you'd like to view in Google Maps to an active map document (File --> Add Data --> Add Data...).
2. Customize the appearance of your shapefiles by right-clicking on the shapefile name in the Table of Contents panel and selecting Properties.... In the Properties window, click the Symbology tab and customize the look of your shapefile. IMPORTANT NOTE: THE FILE WILL APPEAR IN GOOGLE MAPS WITH THE SYMBOLOGY YOU SPECIFY. This means that if you display different colors for different polygons, they will be those same different colors in Google Maps, and will appear in a legend on the left pane of Google maps. This also means that if you want to be able to see the contents of Google Maps under your shapefile, you should make the interior of any polygons transparent!
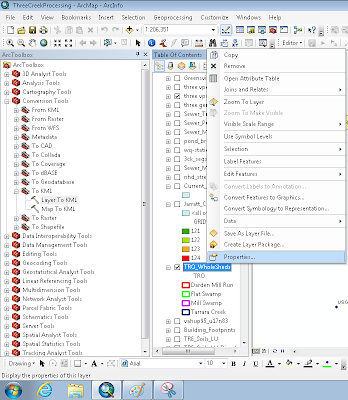
ArcMap Screenshot showing Properties and the Expanded Toolbox (next step)
3. Open ArcToolbox (Geoprocessing --> ArcToolbox) and expand the Conversion Tools heading. Expand the 'To KML' option and double click Layer To KML.
4. In the dialog that appears, under 'Layer' select the layer you want to export. Save it to a useful location you'll be able to find after saving it. Make the 'Layer Output Scale' 1.
Within Google Maps:
1. Go to maps.google.com. If you are already signed in to your Google account, great - if not, click the 'Sign In' link in the upper right corner. You MUST have a Google account of some sort in order to do this.
2. Click the My Places link in the left panel:

3. Click the red 'Create Map' button in the left panel.
4. In the fields that appear, give your map a title and description. Choose the appropriate radio button to indicate whether you want this map Public or Unlisted. Personally I like things I create to go to only my intended audience, so I usually choose Unlisted. Click the Save button if it has not already autosaved.
5. Click the Import link above the Title field.

6. In the dialog that appears, browse and find the KMZ file you exported previously from ArcMap.
7. Poof! You have a map! Click the 'Done' button at the top of the panel.
8. Now for the tricky part...there is probably an easier way to do this, but I haven't discovered it yet. To get the link to share with people, first click on the 'My Places' button at the top of the left panel. Then right-click on the map you just created and select 'Copy Shortcut' - this will copy the link to that map to your clipboard, and you can now paste it into an email or wherever else you choose.
I hope you've found this informative and as exciting as I have! Happy Mapping!
No comments:
Post a Comment